![How To Create a Template in DocuSign Quick & Easy [VIDEO TUTORIAL]](https://www.solusign.com/wp-content/uploads/2025/05/a03cdcc-5518-d165-4c20-f056df0d5578_maxresdefault_17_.jpg)
If you’re finding yourself wasting valuable hours in the day creating documents, communicating back and forth between clients, dragging and dropping Docusign fields on documents each time, waiting for signees to complete a document, troubleshooting errors in agreements, and updating documents with new rules — well, it might be time to learn how to create a template in DocuSign.
Follow along with these 8 simple steps, and you’ll be a pro at creating your own templates in DocuSign in no time! And if you want us to do it for you, check out our Docusign Templates services.
How to create a template in DocuSign
Step 1 — Determine whether your document is dynamic or static.
Before learning how to create a template in DocuSign, you need to understand the difference between a Static and a Dynamic document, as this will dictate determining factors throughout the creation process.
- A document is Dynamic if it contains information specific to your recipient (e.g. Employment Contract or NDA).
- A document is Static if the data does not contain information specific to your recipient (e.g., a Subscription Agreement or a loan application form).
The difference may seem very subtle, but when it comes to making a DocuSign template, it’s important to understand the distinction. This will ultimately determine how you set up and use your templates moving forward.
Step 2 — Open up DocuSign and navigate your way to the templates page, then click ‘new’ and select ‘create template’. If you’re unable to see the templates tab, contact your DocuSign administrator and ask them to update your user permissions. You will need administrator or delegated template creation rights to create a template in DocuSign.
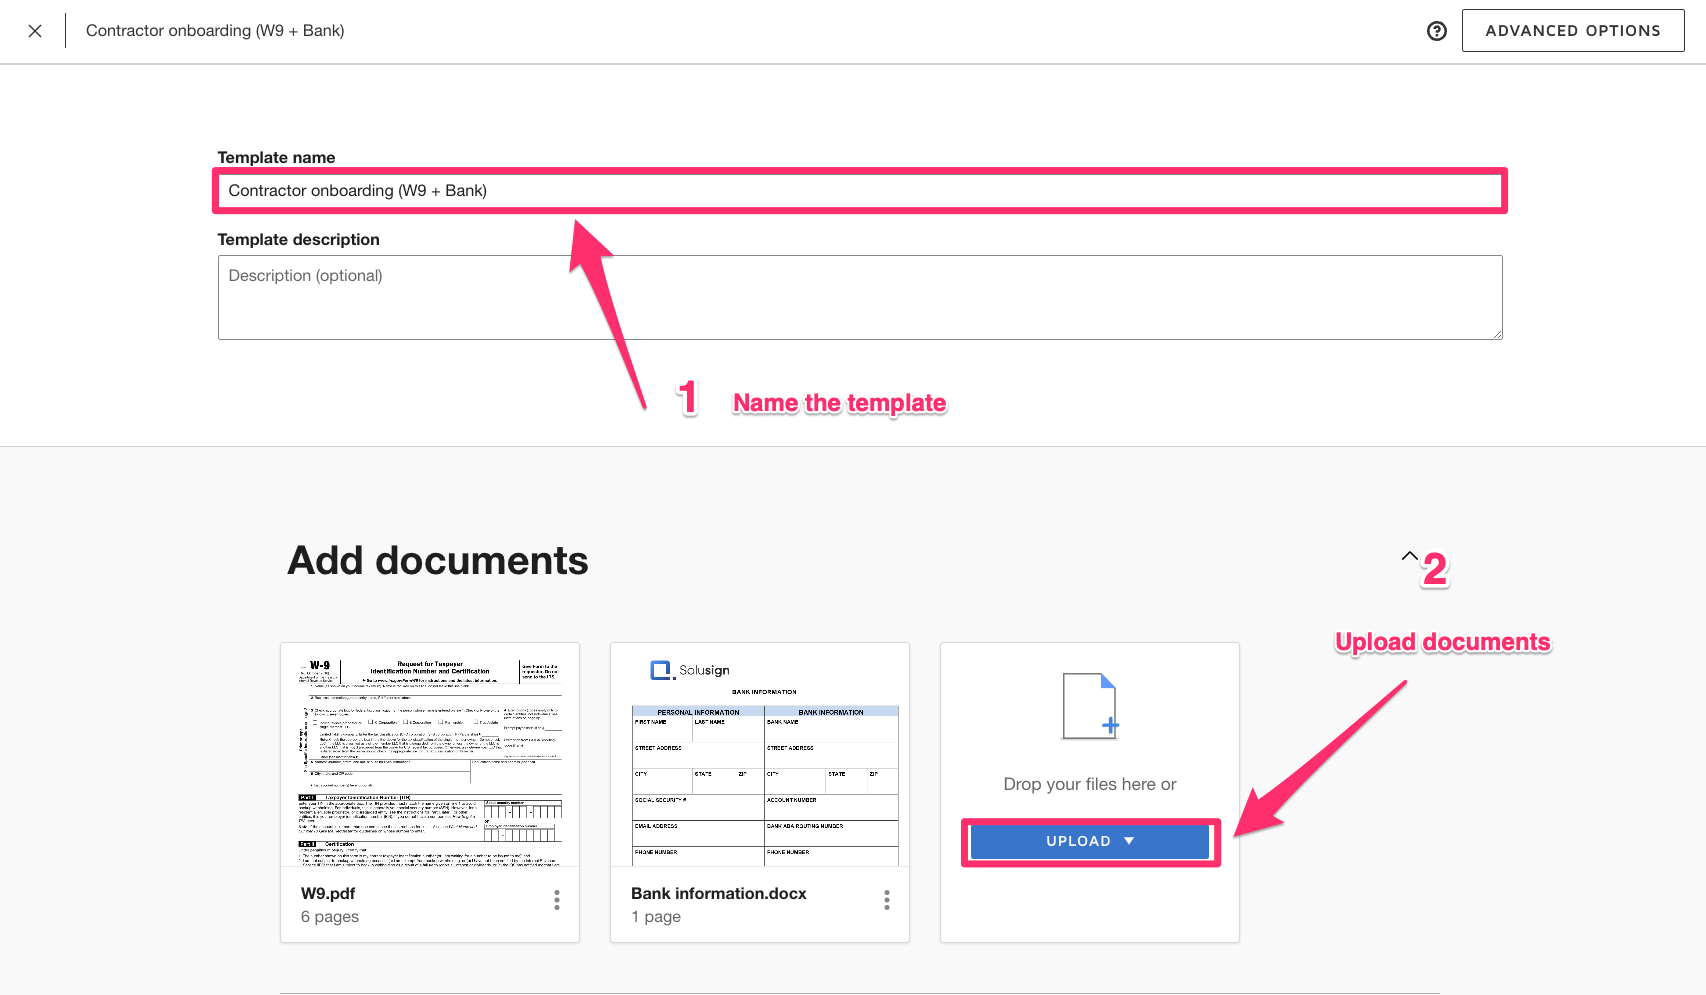
Step 3 — Next, you’ll want to name your template — make sure to give the necessary information whilst remaining as succinct as possible. The purpose of creating DocuSign templates is to streamline the process moving forward, so use clear wording when naming the template. You can then start uploading your documents.
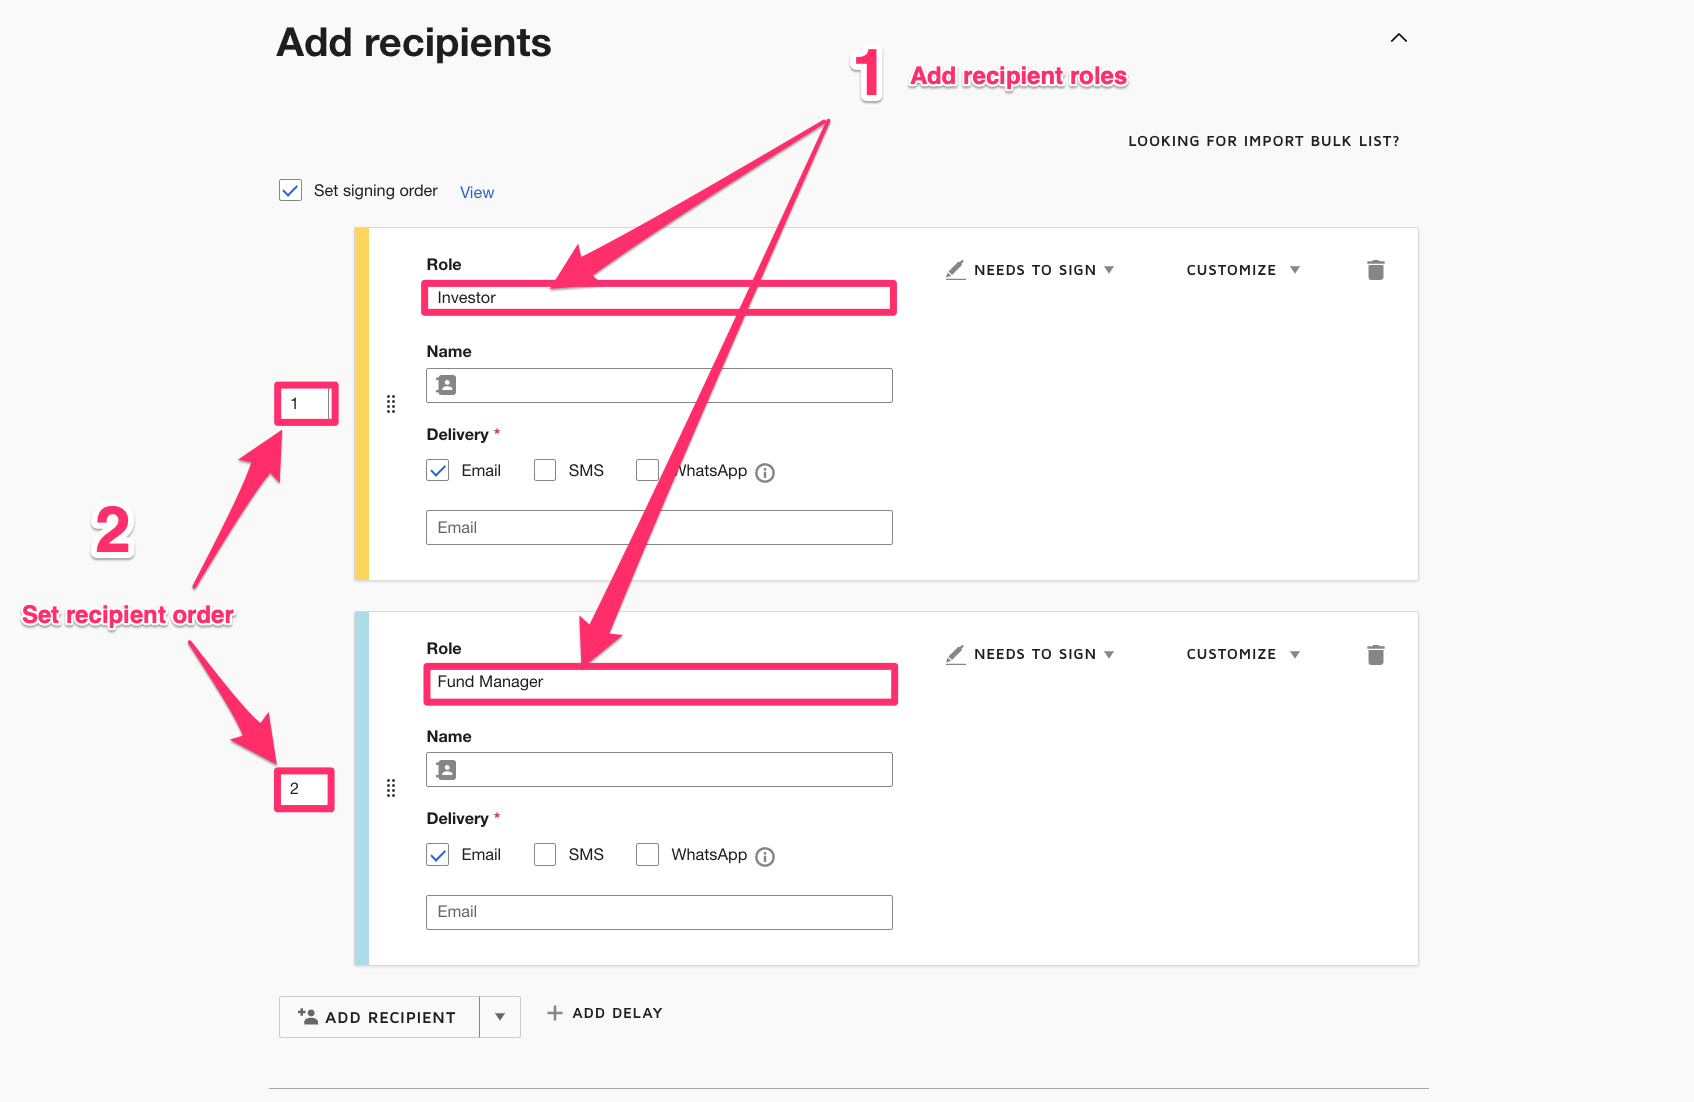
Step 4 — Now you can begin to include important details by adding recipients, placeholders and the signing order. If you’re having some issues moving through this step, here are a couple of important tips:
- ‘Placeholders’ are one of the biggest differences between sending an envelope and learning how to create a template in DocuSign. When sending an envelope with DocuSign (without a template), you only need to enter their name and email address.
- When using templates, you will also find a placeholder field called ‘role’. The optional role field can be used to represent a recipient who won’t be the same every time you will be using the template to send your document. This will save you plenty of time in the future.
- When you later start an envelope using your template, you will fill in the actual person’s information for that role.
- Typically, you use placeholder roles for the recipients rather than named persons, as you will send the template to different people every time you use it. However, you should add the person’s name and email as they will always be included in the template’s workflow.
- For example, if you’re a Fund Manager needing to countersign a Subscription Agreement, you can add your own details instead of adding a placeholder. After this, you won’t have to enter that information every time you use your template. Set a signing order so that you — ‘the manager’ — only receive the envelope when all other recipients have signed.
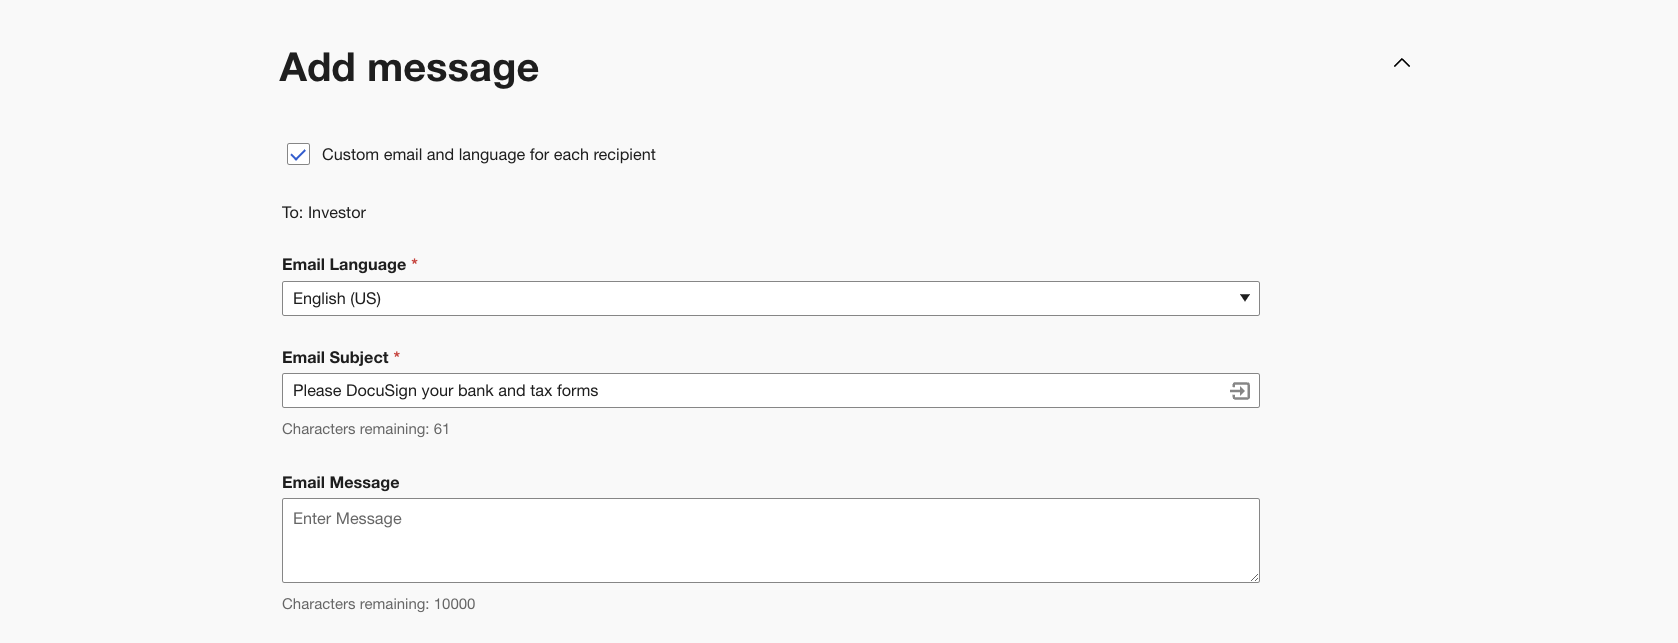
Step 5 — Add an ’email subject’ and ‘message’. This is an optional step, which should be used when needing to prompt an email alert for the signees. You can specify a different email subject and message for each recipient. You’ll also be able to utilise an ‘insert merge field’ feature that allows you to merge your recipients’ names and emails in the email subject. Although this doesn’t work in the email message, you can still use it to your advantage. As the Fund Manager, you might want to know who has signed the agreement without having to open the envelope. By adding the subscriber’s name to the email subject, you will know who’s about to countersign the agreement by looking at the subject line of your email inbox.
Step 6 — Editing ‘Advanced Options’ is another optional step. Although not required, it is highly recommended that you customize the way the template is going to behave with senders and signers, ensuring that everybody gets the same experience. It’s also an ideal time to prevent changes from being made to the template using a password too.

Step 7 — Click ‘Next’
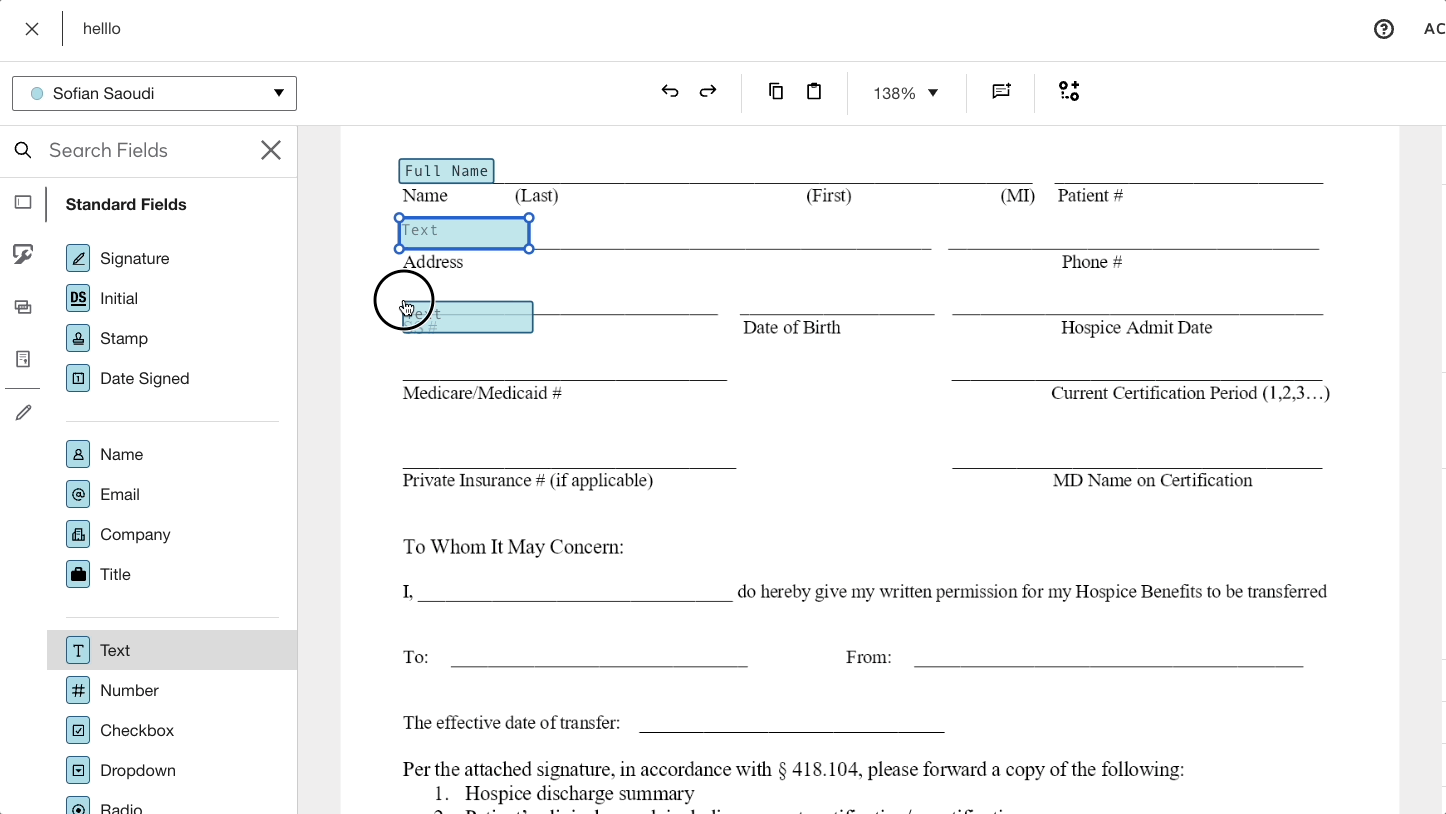
Step 8 — You’ll then want to add any necessary fields for signees to action. This is similar to the process you would follow when creating an envelope. You’ll then be prompted to add fields to your documents. These fields may include prompts for your signer to include their initials, signature or other information. Once you’ve added these fields you can just hit save and close.
And just like that, you’ve learned how to make a DocuSign template. The template is now available for you to use in the ‘templates’ tab of your DocuSign account dashboard. Unless you share the template with others, it is only visible to you (and other Docusign admins) at this point.
Learn more about Solusign’s DocuSign solutions today
Now that you have this functionality down, you’ll be able to reap the benefits of an efficient and streamlined eSignature workflow. If you found these easy steps explaining how to make a DocuSign template, you may be interested in learning more about our range of Solusign services to help streamline your Docusign set up.
Reach out for an obligation-free 30-minute strategy call with one of our DocuSign experts to get started.